

介绍
NetBox 是用于建模和记录现代网络的领先解决方案。由 结合 IP 地址管理 ( IPAM ) 的传统应用和 具有强大 API 和扩展的数据中心基础架构管理 ( DCIM ),NetBox 为推动网络自动化提供了理想的“事实来源”。NetBox 在 Apache 2.0 许可下作为开源软件提供 作为数千个组织中网络自动化的基石。
Netbox 系列:https://songxwn.com/categories/NetBox/
本教程讲述了 4.0 版本的部署和中文化的操作。
目前中文翻译还未完善,加入共同翻译:https://explore.transifex.com/netbox_cn/netbox-cn//
功能
-
物理基础设施:
准确模拟物理世界,从全球区域到单个机柜。然后连接一切 - 网络、Console 和电源!
-
现代的 IPAM:
您期望的所有标准 IPAM 功能,IP 地址自动层级以及 VRF 导入/导出跟踪、VLAN 管理和 Overlay 网络支持。
-
传输线路:
自信地管理来自不同服务提供商的关键电路的交付,并与您自己的基础设施无缝建模。
-
电力跟踪:
将上游电源的配电映射到单个电源线和插座。
-
组织:
以本机方式管理租户和联系人分配。
-
强大的搜索功能:
使用单个全局搜索功能轻松找到您需要的任何内容。
-
综合日志记录:
利用自动更改日志记录和用户提交的日志条目来跟踪 Netbox 随时间的增长。
-
无限制的定制:
自定义字段、自定义链接、标签、导出模板、自定义验证、报告、脚本等!
-
灵活的权限:
高级权限系统可实现非常灵活的权限委派。
-
集成:
通过其 REST 和 GraphQL API 轻松将 NetBox 连接到您的其他工具。
-
插件:
在核心应用程序中找不到您需要的内容?尝试众多社区插件之一 - 或构建自己的插件!
-
认证
支持域控 AD 、LDAP 、SSO 、Azure AD 、Okta 等
NetBox 最初由 DigitalOcean 的网络工程团队构思,专为满足网络和基础设施工程师的需求而开发。
设计理念:
-
复制真实世界( Replicate the Real World )
-
充当“真理之源( Serve as a “Source of Truth”)
-
保持简单( Keep it Simple )
-
应用程序堆栈( Application Stack )
架构图
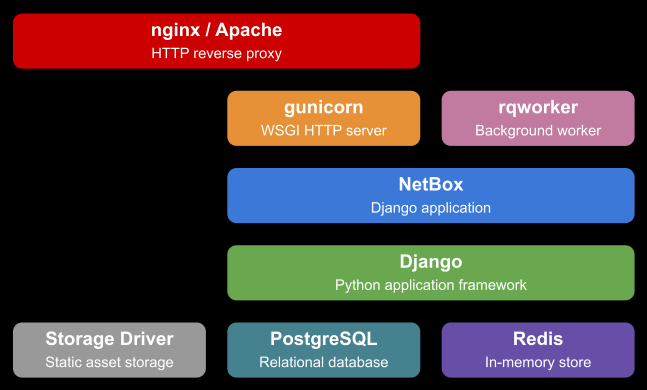
示例图


专为网络打造
与通用 CMDB 不同,NetBox 策划了一个专门满足网络工程师和运营商需求的数据模型。它提供了精心设计的各种对象类型,以最好地满足基础架构设计和文档的需求。这些涵盖了网络技术的所有方面,从 IP 地址管理到布线再到覆盖层等等:
-
分层地区、数据中心和物理位置
-
机架、设备和设备组件
-
线路连接和无线连接管理
-
供电跟踪
-
虚拟线路和提供商
-
虚拟机和群集
-
IP 网段、汇聚和地址
-
VRF 和 RT
-
FHRP 组( VRRP ,HSRP 等)
-
AS 编号
-
VLAN 和作用域 VLAN 组
-
L2VPN 虚拟网络
-
租户分配
-
联系人管理
安装环境介绍
使用 Rocky Linux 9.3 (最小化安装,关闭 SE Linux 和防火墙)
(也适用于 RHEL 9 系列及其衍生发行版)
使用 Python 3.11
使用 PostgreSQL 15
使用 Redis 7
NetBox 版本:4.0.0beta
硬件配置:建议 4C8G 以上,100G 存储空间。
PS:没有使用 Docker 安装是为了方便修改代码和翻译。用 Docker 会更简单些。
安装和配置 PostgreSQL 数据库
关闭 SE Linux 和防火墙
systemctl disable --now firewalld
sed -i 's/^SELINUX=enforcing$/SELINUX=disabled/' /etc/selinux/config && setenforce 0
dnf install tree vim bash-completion -y
# 安装一些工具
安装数据库
dnf module install postgresql:15 -y
# 指定安装 15 版本
postgresql-setup --initdb
# 初始化数据库
vim /var/lib/pgsql/data/pg_hba.conf
# "local" is for Unix domain socket connections only
local   all             all                                     peer
# IPv4 local connections:
host    all             all             127.0.0.1/32            scram-sha-256
# IPv6 local connections:
host    all             all             ::1/128                 scram-sha-256
# 将主机连接的加密方式将 ident 改为 scram-sha-256 即可。
systemctl enable --now postgresql
# 启动并设置开机启动
systemctl status postgresql
ss -an | grep 5432
# 查看是否正常启动
修改密码和创建数据库
sudo -u postgres psql
# 登录到 PostgreSQL shell
ALTER USER postgres WITH PASSWORD 'Songxwn.com';
# 运行查询,为默认的 PostgreSQL 用户“postgres”设置新密码。
CREATE DATABASE netboxdb;
# 创建数据库
quit
# 退出
PS: 优化配置生成器:https://pgtune.leopard.in.ua/
安装和配置 Redis 数据库
深入配置可以参考:https://songxwn.com/redis-sentinel/
dnf module install redis:7 -y
配置访问密码
vim /etc/redis/redis.conf
requirepass Songxwn.com
# 打开配置文件,找到被注释的 requirepass 行,修改密码为 Songxwn.com 。保存文件并退出
配置启动并验证
systemctl enable --now redis
# 配置启动并开机启动
systemctl status redis
ss -an | grep 6379
# 验证启动
redis-cli
127.0.0.1:6379> AUTH Songxwn.com
OK
127.0.0.1:6379> ping
PONG
127.0.0.1:6379> exit
# 输入密码登录验证是否正常
安装准备 Python 3.11 并配置默认的 python 版本
netbox4 要求 python 3.10 以上版本。
dnf install python3.11 python3.11-pip  python3.11-devel python3-pip -y
# 安装 python3.11
mv /usr/bin/python3 /tmp/
ln -s /usr/bin/python3.11 /usr/bin/python3


# 配置默认 python 为 python3.11

pip -V
pip 22.3.1 from /usr/lib/python3.11/site-packages/pip (python 3.11)
python3 -V
Python 3.11.5

# 验证
安装 Netbox 4.0
环境准备
dnf install gcc libxml2-devel libxslt-devel libffi-devel libpq-devel openssl-devel redhat-rpm-config git wget -y
# 安装环境
useradd -r -d /opt/netbox -s /usr/sbin/nologin netbox
# 创建 netbox 用户


cd /opt

# 进入 opt 目录

wget https://github.com/netbox-community/netbox/archive/refs/tags/v4.0-beta1.tar.gz
# 下载 4.0 源代码,如果网络不允许,可以手动下载,上传到服务器。
mv netbox-4.0-beta1 netbox
chown -R netbox:netbox /opt/netbox
cd /opt/netbox/netbox/netbox
# 配置 netbox 文件夹权限所属。
tree  -L 3 /opt/
/opt/
└── netbox
    ├── base_requirements.txt
    ├── CHANGELOG.md
    ├── contrib
    │   ├── apache.conf
    │   ├── gunicorn.py
    │   ├── netbox-housekeeping.service
    │   ├── netbox-housekeeping.sh
    │   ├── netbox-housekeeping.timer
    │   ├── netbox-rq.service
    │   ├── netbox.service
    │   ├── nginx.conf
    │   ├── openapi2.json
    │   └── openapi2.yaml
    ├── CONTRIBUTING.md
    ├── docs
    │   ├── administration
    │   ├── configuration
    │   ├── customization
    │   ├── development
    │   ├── extra.css
    │   ├── features
    │   ├── getting-started
    │   ├── index.md
    │   ├── installation
    │   ├── integrations
    │   ├── introduction.md
    │   ├── media
    │   ├── models
    │   ├── netbox_logo.png
    │   ├── netbox_logo.svg
    │   ├── plugins
    │   ├── reference
    │   ├── release-notes
    │   └── _theme
    ├── LICENSE.txt
    ├── mkdocs.yml
    ├── netbox
    │   ├── circuits
    │   ├── core
    │   ├── dcim
    │   ├── extras
    │   ├── generate_secret_key.py
    │   ├── ipam
    │   ├── manage.py
    │   ├── media
    │   ├── netbox
    │   ├── project-static
    │   ├── reports
    │   ├── scripts
    │   ├── templates
    │   ├── tenancy
    │   ├── users
    │   ├── utilities
    │   ├── virtualization
    │   └── wireless
    ├── NOTICE
    ├── pyproject.toml
    ├── README.md
    ├── requirements.txt
    ├── scripts
    │   ├── git-hooks
    │   └── verify-bundles.sh
    ├── SECURITY.md
    └── upgrade.sh
# 查看当前目录结构
生成并配置加密密钥
cd /opt/netbox/netbox/netbox
# 确保进入到此目录
sudo -u netbox cp configuration_example.py configuration.py
# 创建配置文件,指定用户权限
sudo -u netbox python3 ../generate_secret_key.py
# 生成密钥,生成的密钥示例:SOGo0)YKa^RMGs&b=4p1AtnB-5nZq(!N#2-cah$q972DPCf&%F
sudo -u netbox vim configuration.py
SECRET_KEY = 'SOGo0)YKa^RMGs&b=4p1AtnB-5nZq(!N#2-cah$q972DPCf&%F'
# 打开配置文件,将生成的密钥写入进去。
配置数据库连接、本地化、时区。
cd /opt/netbox/netbox/netbox
sudo -u netbox vim configuration.py
ALLOWED_HOSTS = ["*"]
# 代表可以通过任意域名访问 Netbox
DATABASE = {
    'ENGINE': 'django.db.backends.postgresql',  # Database engine
    'NAME': 'netboxdb',               # 配置数据库名字
    'USER': 'postgres',               # 数据库用户
    'PASSWORD': 'Songxwn.com',            # 数据库用户密码
    'HOST': 'localhost',      # Database server
    'PORT': '',               # Database port (leave blank for default)
    'CONN_MAX_AGE': 300,      # Max database connection age
}
REDIS = {
    'tasks': {
        'HOST': 'localhost',
        'PORT': 6379,
        'USERNAME': '',
        'PASSWORD': 'Songxwn.com',  #配置数据库密码
        'DATABASE': 0,
        'SSL': False,
    },
    'caching': {
        'HOST': 'localhost',
        'PORT': 6379,
        'USERNAME': '',
        'PASSWORD': 'Songxwn.com',  #配置数据库密码
        'DATABASE': 1,
        'SSL': False,
    }
}
SECRET_KEY = 'SOGo0)YKa^RMGs&b=4p1AtnB-5nZq(!N#2-cah$q972DPCf&%F'
# 加密密钥
ENABLE_LOCALIZATION = True
# 开启本地化,让其可以更换语言。
TIME_ZONE = 'Asia/Shanghai'
# 配置时区
PAGINATE_COUNT = 60
# 配置查看的时候默认分页数量
初始化 python 虚拟环境,初始化数据库,生成静态 Web 。
sed -i '1i pip config set global.index-url https://pypi.tuna.tsinghua.edu.cn/simple' /opt/netbox/upgrade.sh
# 配置安装环境的时候,使用清华源的 pypi 。(可不配置)
sudo -u netbox /opt/netbox/upgrade.sh
# 执行安装,需要较久时间。
Completed.
Removing expired user sessions (python3 netbox/manage.py clearsessions)...
Clearing the cache (python3 netbox/manage.py clearcache)...
Cache has been cleared.
Upgrade complete! Don't forget to restart the NetBox services:
  > sudo systemctl restart netbox netbox-rq
# 出现以上字符代表成功。
创建管理员账号
source /opt/netbox/venv/bin/activate
# 进入虚拟环境
cd /opt/netbox/netbox
python3 manage.py createsuperuser
Username (leave blank to use 'root'): admin
Email address: [email protected]
Password:
Password (again):
Superuser created successfully.
# 创建管理员 admin ,输入邮箱和两遍密码。
配置每天定时清理任务
sudo ln -s /opt/netbox/contrib/netbox-housekeeping.sh /etc/cron.daily/netbox-housekeeping
配置 Gunicorn WSGI
Gunicorn 是一个 Python 的 WSGI HTTP 服务器。
sudo -u netbox cp /opt/netbox/contrib/gunicorn.py /opt/netbox/gunicorn.py
# 复制创建配置文件
sudo -u netbox vim /opt/netbox/gunicorn.py
# 可修改配置文件,更改监听端口,默认 8001
cp -v /opt/netbox/contrib/*.service /etc/systemd/system/
# 复制到系统服务
systemctl daemon-reload
# 重新加载系统服务
systemctl enable --now netbox netbox-rq
# 配置启动并开机启动
systemctl status netbox
systemctl status netbox-rq
# 查看状态
配置 Nginx 作为反向代理
dnf install nginx -y
# 安装 Nginx
vim /etc/nginx/conf.d/netbox.conf
# 创建配置文件,注意修改 netbox.songxwn.com 为自己的域名。反向代理到 8001 端口
server {
    listen 80;
    # CHANGE THIS TO YOUR SERVER'S NAME
    server_name netbox.songxwn.com;
    client_max_body_size 25m;
    fastcgi_connect_timeout 1200s;
    fastcgi_send_timeout 1200s;
    fastcgi_read_timeout 1200s;
    fastcgi_buffer_size 64k;
    fastcgi_buffers 4 64k;
    fastcgi_busy_buffers_size 128k;
    fastcgi_temp_file_write_size 256k;
    location /static/ {
        alias /opt/netbox/netbox/static/;
    }
    location / {
        proxy_pass http://127.0.0.1:8001;
        proxy_set_header X-Forwarded-Host $http_host;
        proxy_set_header X-Real-IP $remote_addr;
        proxy_set_header X-Forwarded-Proto $scheme;
		proxy_connect_timeout       600;
        proxy_send_timeout          600;
        proxy_read_timeout          600;
        send_timeout                600;
    }
}
systemctl enable --now nginx
# 配置启动并开机启动
systemctl status nginx
# 查看状态
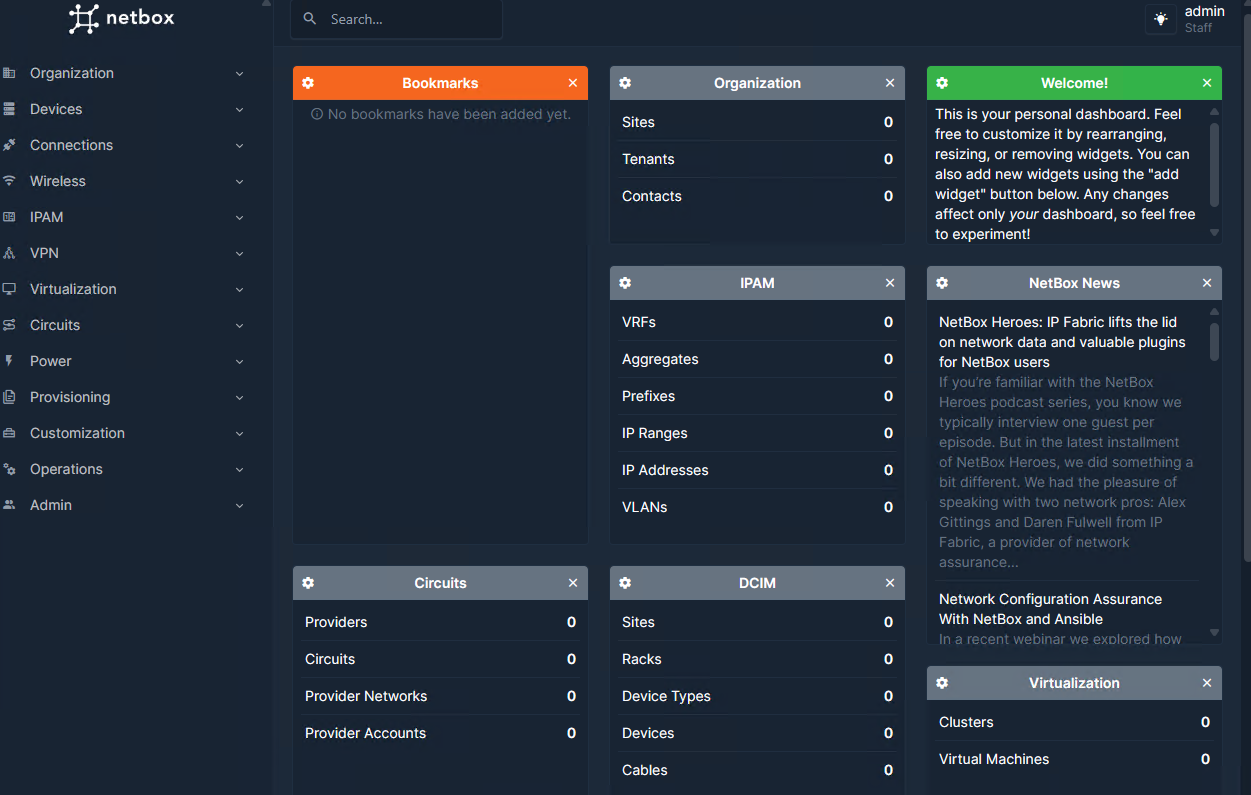
至此安装完成,可以打开你的域名,输入管理员账号登录。
中文化
4.0 开始支持 Web 国际化
cd /opt/netbox/netbox/translations/en/LC_MESSAGES

# 进入英语语言目录

mv django.po /tmp

# 移动原文件到 tmp


wget -O django.po https://songxwn.com/file/netbox-cn_zh_CN_240412.po

# 下载中文文件到此,并重命名为 django.po


source /opt/netbox/venv/bin/activate

# 进入 python 虚拟环境

cd /opt/netbox/netbox

# 进入工作目录

./manage.py compilemessages


# 刷新翻译

chown -R netbox:netbox /opt/netbox

# 重新设定权限

systemctl restart netbox netbox-rq

# 重启进程
下载最新中文 po 文件并加入翻译团队
目前中文翻译还未完善,加入共同翻译:https://app.transifex.com/netbox_cn/netbox-cn/language/zh_CN/
1 条回复 • 2024-04-17 19:24:11 +08:00
 |
1
luoyide2010 13 天前
收藏了,有机会试用下
|